Mobile ItemRenderer in ActionScript (Part 2)
This is Part 2 of my series "Mobile ItemRenderers in ActionScript". This time I will explore how to apply drop shadows using a second TextField.
This is Part 2 of my series "Mobile ItemRenderers in ActionScript". This time I will explore how to apply drop shadows using a second TextField.
You can find part 1 here for reference
Why do we use a second TextField?
As many of you may know, it is not recommended to use filters like drop shadow, bevel, or others on a DisplayObject when you are developing for Mobile. This is mostly because the player needs to create an extra image for each object that has a filter and that can bring performance issues. So if we want a text field with some drop shadow, the workaround is to have a second text field under it and move it a pixel down to mimic the effect.
Styles
I have a text-drop-shadow-color property to pass the color of the shadow to the renderer. We also have a background-color style to have some contrast and be able to see the shadow. The rest is very similar to our previous example.
renderers|SpriteShadowLabel
{
	font-size: 20;
	color: #222222;
	font-family: _sans;
	font-weight: bold;
	min-height: 50;
	padding-left: 10;
	text-drop-shadow-color: #ffffff;
	background-color: #bbbbbb;
}
SpriteVisualElement vs UIComponent
In the previous example, we were extending from UIComponent. This time we are getting rid of UIComponent and using a more light weight component. The problem is that the List needs an IVisualElement and because of that, we are extending from SpriteVisualElement (Note: you can implement the IVisualElement interface and not use the SpriteVisualElement at all).
The other problem that we have now is that the SpriteVisualElement is not as complete as the UIComponent. We are missing something that the UIComponent provided us: CSS support. To fix that I created a simple class called StyleClient that implements the IStyleClient and allows the component to participate in the styling framework. In addition to that, this class includes the measure, createChildren and updateDisplayList in a similar way as the UIComponet (but much simpler). With that we can change the inheritance from UIComponent to StyleClient. The swap between classes can be made because some of the methods of UIComponent are supported in the StyleClient.
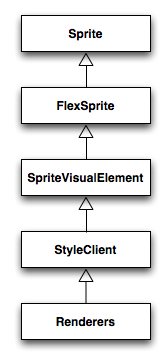
One thing that's important to mention is that the StyleClient does not wait for the next frame to commit the properties or invalidate. If that is needed, it is not really hard to implement. You can see the inheritance chain of our renderers in the picture below.
I'm not going to paste all the code of the StyleClient, because this class is basically the implementation of the IStyleClient interface (with the exception of registerEffects that I didn't feel that I needed). I want to highlight a few things though: first, notice that the method setLayoutBoundsSize calls updateDisplayList internally because this is the method that the List will use to layout the renderers.
override public function setLayoutBoundsSize(width:Number, height:Number, postLayoutTransform:Boolean = true):void
{
	if ( isNaN( width ) )
		width = getPreferredBoundsWidth( postLayoutTransform );

	if ( isNaN( height ) )
		height = getPreferredBoundsHeight( postLayoutTransform );

	layoutWidth = width;
	layoutHeight = height;
	updateDisplayList( width, height );
}
Second, we call measure and createChildren once all the styles are ready in stylesInitialized, to make sure that all the assets that we need for the renderer that are coming from the CSS are available.
public function stylesInitialized():void
{
	if( !creationComplete )
	{
		createChildren();
		creationComplete = true;
		measure()
	}
}
SpriteShadowLabel Renderer
Let's take a look at the Renderer now. I'm reusing some of the code from the previous example: the data setter, the measure method and the constructor are very similar. The difference is that the data setter calls setValues if the TextFields are already created.
The other 3 methods for this class are:
- createChildren where we create both TextFields and we delegate the task of creation and reading the styles to the TextUtil (more on that later).
- updateDisplayList we layout both TextFields and draw the background and separator.
- setValues sets the data to both TextFields.
package renderers
{
	import core.StyleClient;
	import flash.text.Font;
	import flash.text.TextField;
	import mx.core.IDataRenderer;
	import utils.TextUtil;

	public class SpriteShadowLabel extends StyleClient implements IDataRenderer
	{
		//  Protected properties
		protected var labelField:TextField;
		protected var labelShadowField:TextField;

		//  Public Setters and Getters
		protected var _data:Object;
		public function set data( value:Object ):void
		{
			if( data == value )
				return;
			_data = value;
			// if the textfield has been created we set the text
			if( labelField )
				setValues();
		}
		public function get data( ):Object
		{
			return _data;
		}

		//  Contructor
		public function SpriteShadowLabel()
		{
			percentWidth = 100;
		}

		//  Override Protected Methods
		override protected function measure():void
		{
			measuredHeight = getStyle( "minHeight" );
		}
		//--------------------------------------------------------------------------
		override protected function createChildren():void
		{
			labelShadowField = TextUtil.createSimpleTextField( this )
			TextUtil.changeColor( labelShadowField, getStyle( "textDropShadowColor" ) );
			addChild( labelShadowField );

			labelField  = TextUtil.createSimpleTextField( this )
			addChild( labelField );

			if( data )
				setValues();
		}
		//--------------------------------------------------------------------------
		override protected function updateDisplayList( unscaledWidth:Number, unscaledHeight:Number ):void
		{
			// position the field
			labelField.x = getStyle( "paddingLeft" );
			labelField.y = (unscaledHeight - labelField.textHeight ) / 2;

			labelShadowField.x = labelField.x;
			labelShadowField.y = labelField.y + 1;

			// drawbackground Color
			graphics.clear();
			graphics.beginFill( getStyle( "backgroundColor" ) );
			graphics.drawRect( 0, 0, unscaledWidth, unscaledHeight );
			graphics.endFill();

			// draw a separator line between each item
			var lineY:int = unscaledHeight -1;
			graphics.lineStyle( 1 );
			graphics.moveTo( 0, lineY );
			graphics.lineTo( unscaledWidth, lineY );
		}

		protected function setValues():void
		{
			// if the data is not null, set the text
			var text:String = ( data ) ? Font( data ).fontName : "";
			labelField.text = text;
			labelShadowField.text = text;
		}
	}
}
TextUtil
This helper class creates a TextField and sets all the styles (bold, italic, font family, etc) and a couple of properties like autoSize and selectable in the new TextField been created. All the styles for the text fields are coming from CSS, from a class selector example: .myClass or from a type selector example: MyItemRender.
package utils
{
	import flash.text.TextField;
	import flash.text.TextFormat;
	import flash.text.TextFormatAlign;
	import flash.utils.getQualifiedClassName;
	import mx.styles.CSSStyleDeclaration;
	import mx.styles.ISimpleStyleClient;
	import mx.styles.IStyleManager2;
	import mx.styles.StyleManager;

	public class TextUtil
	{
		public static function createSimpleTextField(  client:Object, selectable:Boolean = false, autoSize:String = "left", includeAll:Boolean = false ):TextField
		{
			var textField:TextField = new TextField();
			client = getStyleClient( client );
			var textFormat:TextFormat = readTextFormat( client, includeAll );
			textField.defaultTextFormat = textFormat;
			textField.selectable = selectable;
			if( autoSize != "" )
			{
				textField.autoSize = autoSize;
			}
			return textField;
		}

		public static function getStyleClient( client:Object ):Object
		{
			var styleClient:Object;
			if( client is ISimpleStyleClient )
			{
				styleClient = client;
			}
			else
			{
				var styleManager:IStyleManager2 = StyleManager.getStyleManager( null );
				var selector:String = ( client is String ) ? "." + String( client ) : getQualifiedClassName( client ).replace("::", ".");
				var styleDeclaration:CSSStyleDeclaration = styleManager.getStyleDeclaration( selector );
				styleClient = styleDeclaration;
			}
			return styleClient;
		}

		public static function readTextFormat( client:Object, includeAll:Boolean = false ):TextFormat
		{
			var textFormat:TextFormat = new TextFormat();
			var align:String = client.getStyle("textAlign");
			if (align == "start")
				align = TextFormatAlign.LEFT;
			if (align == "end")
				align = TextFormatAlign.RIGHT;
			textFormat.align = align;
			textFormat.bold = client.getStyle( "fontWeight" ) == "bold";
			textFormat.color = client.getStyle( "color" );
			textFormat.italic = client.getStyle("fontStyle") == "italic";
			textFormat.font = client.getStyle( "fontFamily" );
			textFormat.size = client.getStyle( "fontSize" );
			textFormat.leading = client.getStyle("leading");

			if( includeAll )
			{
				textFormat.blockIndent = client.getStyle("blockIndent");
				textFormat.bullet = client.getStyle("bullet");
				textFormat.indent = client.getStyle("textIndent");
				textFormat.leftMargin = client.getStyle( "leftMargin" );
				textFormat.letterSpacing = client.getStyle("letterSpacing");
				textFormat.rightMargin = client.getStyle( "rightMargin" );
				textFormat.underline = client.getStyle("textDecoration") == "underline";

				var kerning:* =  client.getStyle("kerning");
				if (kerning == "auto" || kerning == "on")
					kerning = true;
				else if (kerning == "default" || kerning == "off")
					kerning = false;
				textFormat.kerning = kerning;
			}
			return textFormat;
		}

		public static function changeColor( textField:TextField, color:uint ):void
		{
			if( textField.textColor != color )
				textField.textColor = color;
		}
	}
}
Continue reading Part 3 of this series on Item Renderers